How to Set Up a WhatsApp Business Account

TL;DR: Quick Summary
- WhatsApp has 3B+ active users, so a Business account helps you meet customers where they already chat.
- Choose the right option: free WhatsApp Business App for SMEs, or WhatsApp Business API (Cloud/on-premise) for scale and multi-user workflows.
- Setting up the Business App is simple: download, verify number, create a profile (name, category, photo), and add key business info and hours.
- For the API, use an official Meta BSP (e.g., SleekFlow) for secure access, support, and advanced features like automation and AI agents.
- SleekFlow enables team inboxes, syncing contacts/history, adding more numbers, and scaling broadcasts and operations.
- Case studies show upgrading from the free app to API improves response speed, inquiries, and campaign performance.
WhatsApp is the world's leading messaging platform with 3+ billion active users—and it's where your customers already are. Whether you're a small business handling customer inquiries or an enterprise scaling support operations, setting up a WhatsApp Business account is essential for modern customer engagement.

Obviously, if your business aims to better connect with your customers, priority should be given to establishing an official presence on WhatsApp. Previously, we have summarized the features of the free WhatsApp Business App, as well as shared some great features of WhatsApp Business API and hacks to unlock its multi-user function. This time, we will get back to basics and provide you with a step-by-step guide to setting up your own WhatsApp Business account.
Let’s get started!
Looking to set up a WhatsApp Business API account instead? Check out the WhatsApp API integration guide here.
Types of WhatsApp Business accounts
There are three types of WhatsApp Business accounts:
1. Free WhatsApp Business App
Most sellers are already aware of this option. Designed for SMEs, the free WhatsApp Business App account provides basic features like a simple business profile showing the business name, operating hours, and product catalogs while offering basic features such as limited quick replies.
2. Official WhatsApp Business API /WhatsApp Business Platform
The official WhatsApp Business API or WhatsApp Business platform, as a paid solution, has a wide range of useful and highly functional features that can help businesses scale quickly and efficiently using the WhatsApp Official Business Account (OBA).
WhatsApp Official Business Accounts (OBA)
For WhatsApp Official Business Accounts (OBA), there are two options: WhatsApp on-premise API and WhatsApp Cloud API. The features are similar, but the differences lie in their backend settings:
For either of the options above, you can choose a WhatsApp Business Solution Provider (BSP) officially assigned by Meta or use your own in-house developer resources.
How set up the WhatsApp Business App?
To register a WhatsApp Business account for your own business, you will need to do the following:
1. Download the WhatsApp Business App on Apple App Store or Google Play Store.
2. Click the WhatsApp Business icon on your home screen to launch the app.
3. Confirm your understanding and acceptance of the WhatsApp Business Terms of Service, tap “Agree”.
4. Select your region and fill in your phone number in the international phone number format.
5. Choose to verify your number through SMS or phone call, then enter the 6-digit registration code.
6. Enable access to your contacts and photos. Contacts from your phone’s address book will then be automatically synced.
7. Enter your business name, business category, and profile picture to create an account.
8. Go to “Explore” > “Business Profile”. Fill in important business information such as your business address, website, description, and opening hours.
9. Done! You can now start sending messages.
How to get started with the official WhatsApp Business API?
When setting up your WhatsApp Business API, it's crucial to use an official WhatsApp Business Solution Provider (BSP).
BSPs are the only authorized way to access the WhatsApp Business API, ensuring your communications are secure, effective, and reliable.
Using an official BSP like SleekFlow gives you:
Reliable access: Get seamless integration and advanced messaging capabilities through the official WhatsApp Business API.
Enhanced security: Platforms like SleekFlow prioritize data privacy and adhere to global standards like GDPR to protect customer information.
Full support: Receive expert guidance and support to optimize your customer interactions.
AgentFlow: Streamline your team’s workflows and improve efficiency with AI agents, designed to empower collaborative customer engagement.
1. Fill in the request form
Go to https://app.sleekflow.io/request-whatsapp and fill in the request form, you can refer to the table below on how to retrieve some essential information:
SleekFlow will start processing your application immediately and your application for approval. The entire process should take between 2 to 3 weeks.
2. Use SleekFlow with the WhatsApp Business API
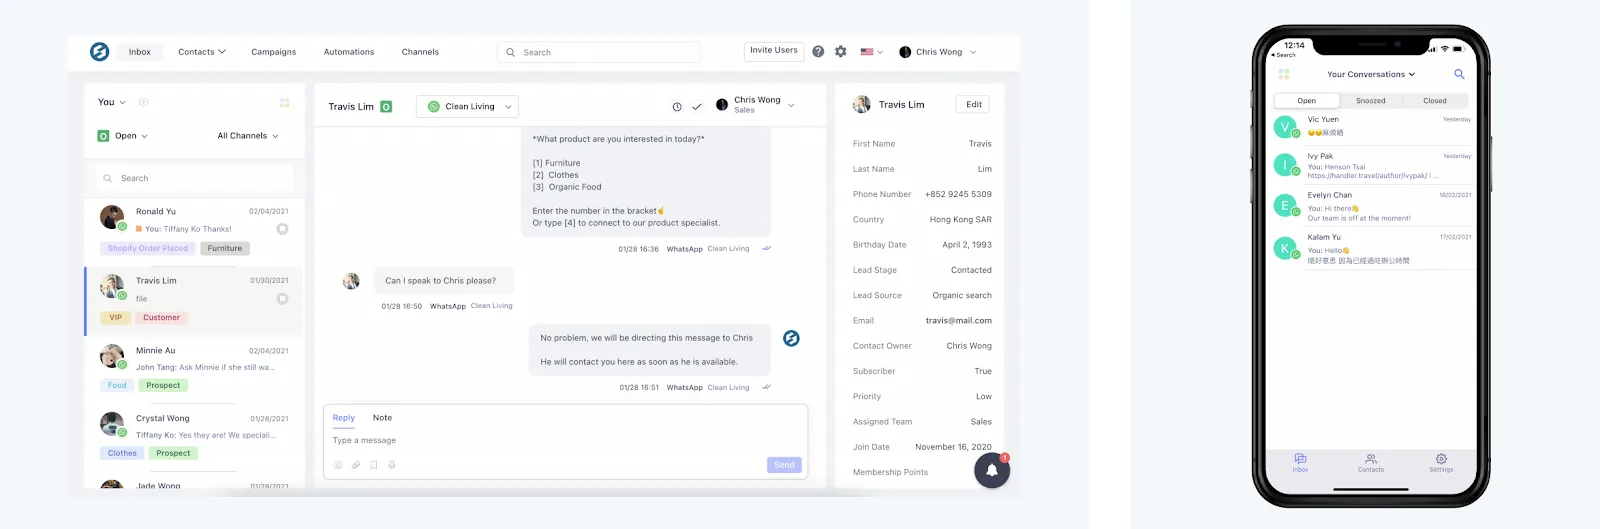
Once approved, your team can start using the SleekFlow Web and Mobile app to run WhatsApp simultaneously.
1. Connect WhatsApp account to SleekFlow
To get started, you will first need to install the WhatsApp or WhatsApp Business App on your phone.
For the integration to function properly, please be reminded that:
The device should be connected to Wi-Fi and charged
Avoid using Desktop/ Web WhatsApp
Keep WhatsApp App running in the background to maintain stable connectivity
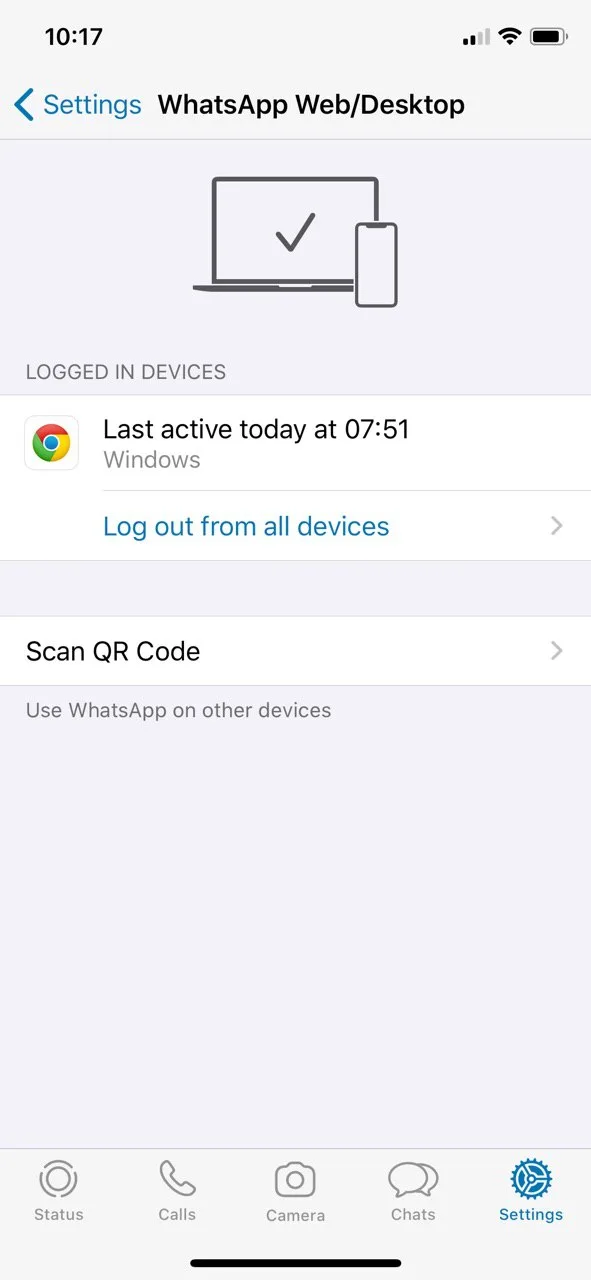
Launch WhatsApp and go to “Settings” > “WhatsApp Web/ Desktop”. Click “Log out from all devices”.
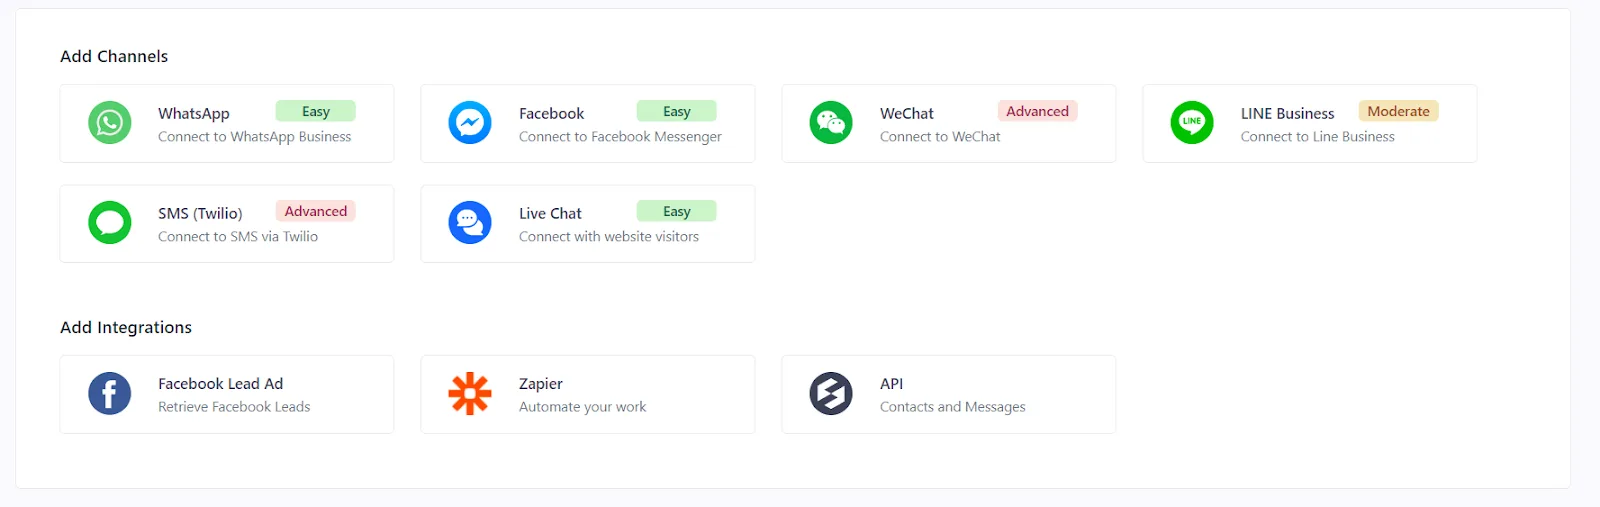
Head over to “SleekFlow Platform – Channel”. Add WhatsApp to SleekFlow by pressing the WhatsApp icon under “Add Channels”.
Scan the QR code with your WhatsApp app, then click “I have already scanned the QR code” to continue.
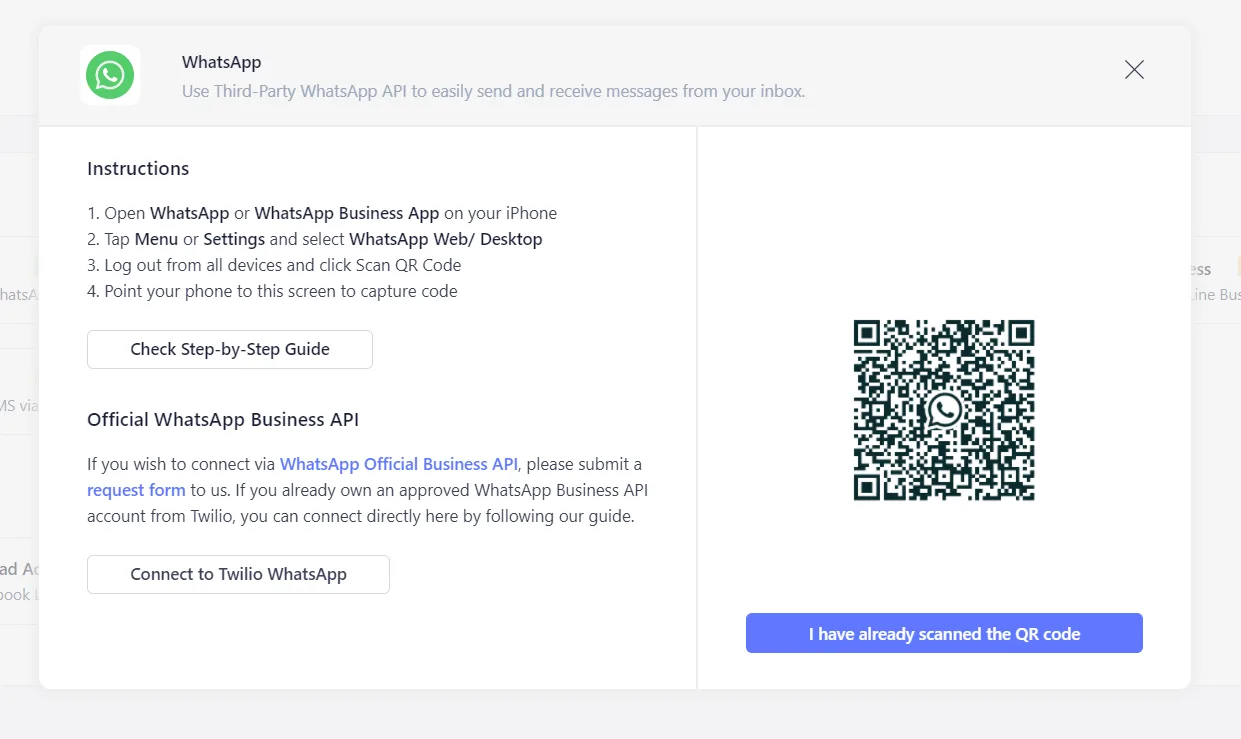
Type in Channel Name (e.g. Sales Team, Customer Service, Operations Team) for this specific WhatsApp Integration.
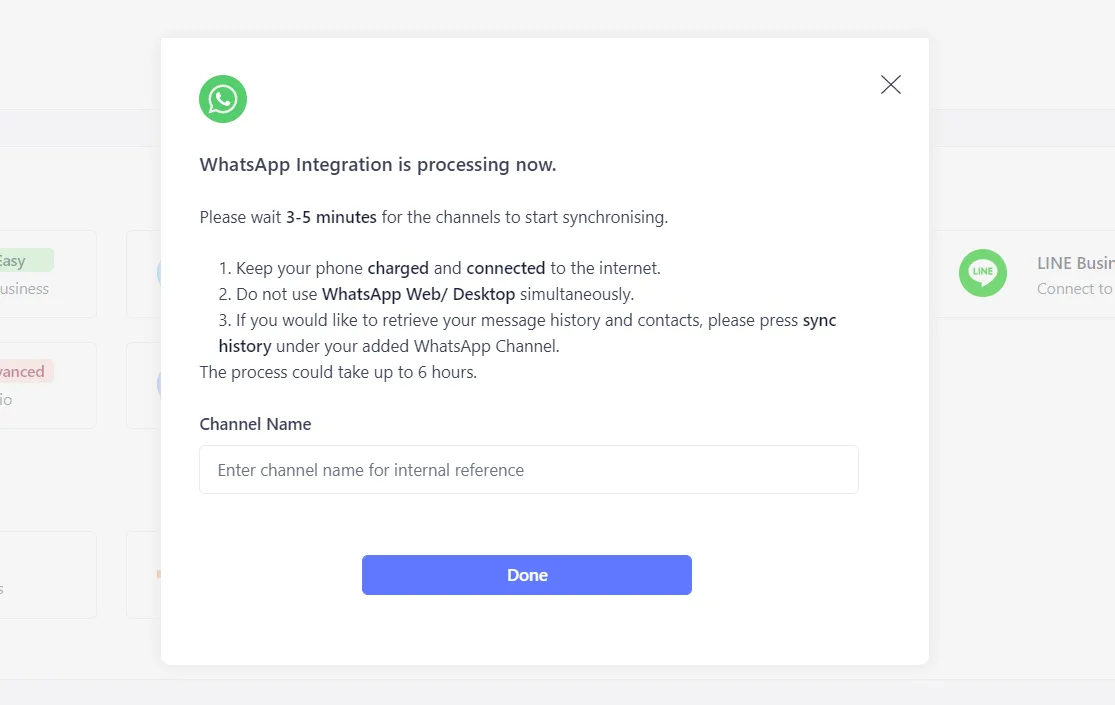
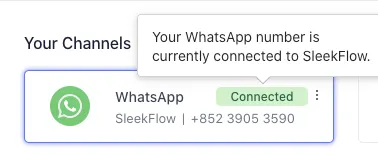
The channel will be shown as “Connected” in about 60 minutes, you can then start sending and receiving messages. Otherwise, please refer to the troubleshooting guide.
2. Synchronize contacts and conversation history
Go to the 3 dots of your “Connected” WhatsApp Channel and click “Sync History”. You are recommended to sync history at midnight so as to not interfere with sending and receiving of messages.
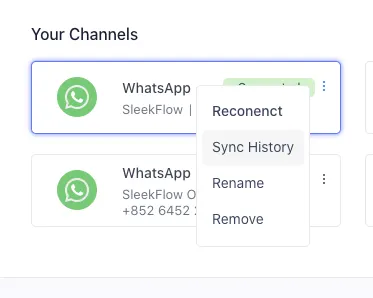
If the process goes smoothly, the status will be updated to a success banner.

Or else, the “Sync Failed” banner will pop up. Try “Sync History” again.

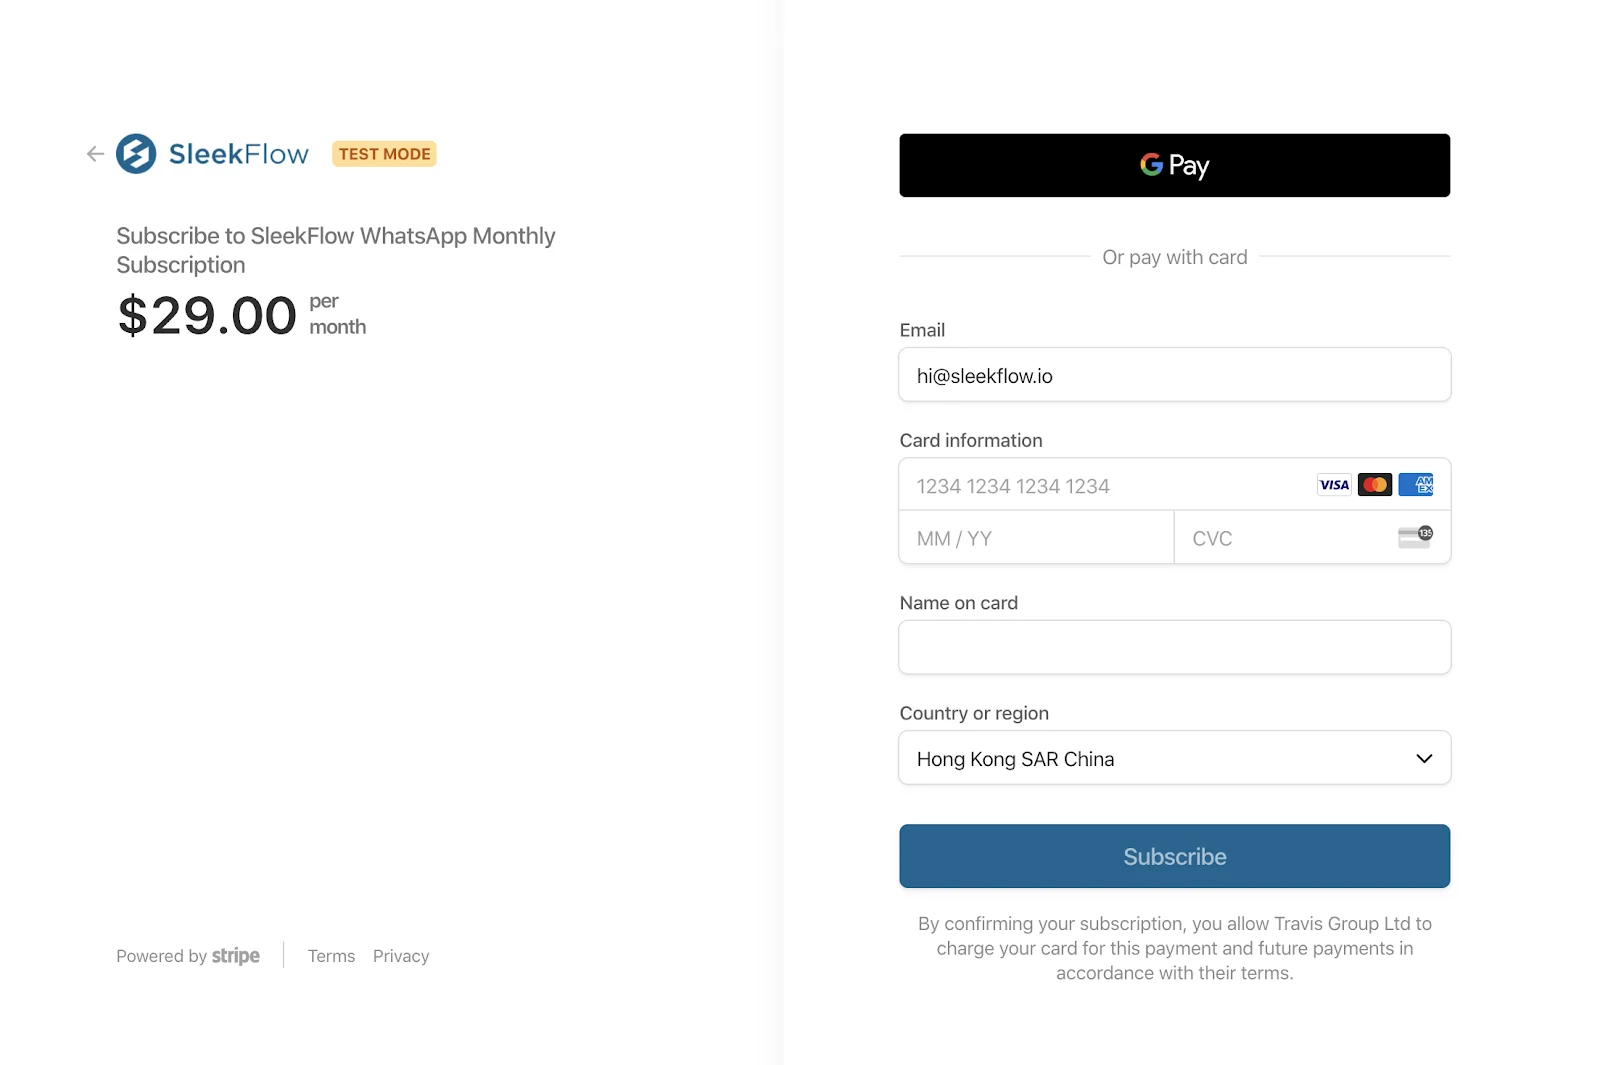
3. Add a second WhatsApp Number
To integrate with more than one third-party WhatsApp Business API, you need to pay a subscription fee of $29 USD /month for each additional number.
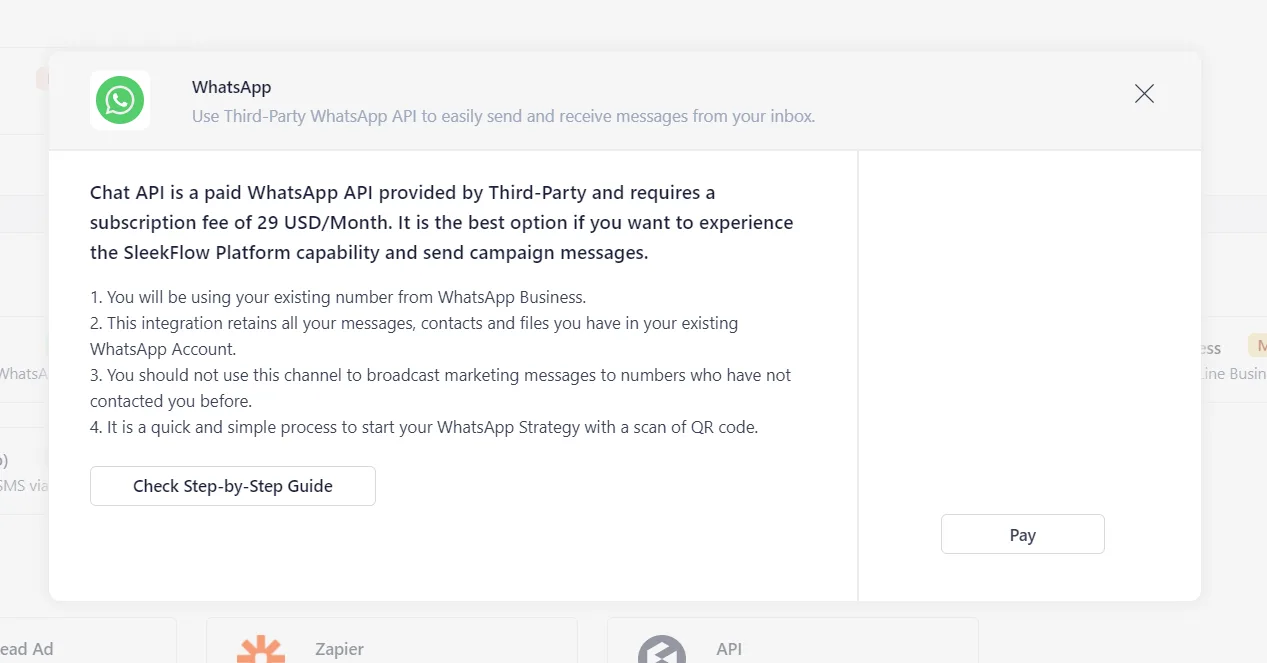
Your credit card will be immediately charged the full sum.
Set up your WhatsApp Business Platform with SleekFlow today!
WhatsApp is the leading messaging app being used today. It surpasses Instagram, Facebook Messenger and WeChat on the matter. Thus, it is no wonder that using WhatsApp for your business communication can contribute well to your progress, especially for small or startup businesses. Learning how to create a WhatsApp business account is the initial step every business owner must take to be able to utilize the endless possibilities the app has to offer.
Here at SleekFlow, we want to help every company in building their personalized messaging platform through WhatsApp for business. We offer guides on how to create a WhatsApp business account as well as the actual product and after-sales services.
How Natural Signature Scaled Its Communication From Free App to API with SleekFlow
Natural Signature, a pioneer in unmanned furniture retail in Malaysia, was using the free WhatsApp Business App for customer communication.
The free app's limitation to a single device created major issues. The customer service team couldn't handle inquiries efficiently, leading to delayed responses.
Natural Signature upgraded to SleekFlow’s WhatsApp Business API, which allowed multiple agents to work simultaneously and enabled them to implement automated workflows.
A 98% increase in inquiries.
5x growth in their WhatsApp contact base.
A 70% read rate for broadcast campaigns.
KHIND Secured a Payment Channel via SleekFlow's WhatsApp API
KHIND, a Malaysian electrical appliances manufacturer, sought to improve payment processes for its Rent-To-Own (R2O) program while ensuring trust and security.
Manual communication via personal WhatsApp accounts raised security concerns and lacked centralization. Customers hesitated to share payment details due to fear of scams.
KHIND adopted SleekFlow’s WhatsApp API, integrating a secure system linking their POS. Automated reminders and follow-ups for billing further streamlined operations.
82% read rate on bill reminders
12% reply rate on those same reminders
A 2x increase in operational efficiency
Connect to WhatsApp Business API now!
Connect to WhatsApp Business API and unlock powerful tools to engage your audience.


